(English follows French)
Je ne prends pas toujours ma pause déjeuner au travail (c’est tellement tentant de manger à son bureau au-dessus du clavier) mais aujourd’hui je suis assise dans la cafétéria avec mon portable pour poster au sujet de mon nouveau chandail (cape? poncho?) que j’ai d’ailleurs présentement sur le dos. C’est rare que je porte un chandail tricoté au travail, encore moins mon propre design, mais je suis tellement ravie avec celui-ci, pas question que je le laisse à la maison. Si je suis chanceuse une collègue me prêtera un compliment et pour une fois je serai en mesure de répondre "OUI!!" lorsqu'on me demande si c'est moi qui ai tricoté mon chandail.
Je me suis mise à danser comme une folle hier soir après l’avoir enfilé pour la première fois. Bien sûr, quelques photos plus tard et certains détails m’embêtent un peu :
- Le col bateau est un peu trop large à mon gout. Si vous suivez mes instructions à la lettre, le vôtre le sera probablement aussi. Super si vous aimez porter vos pulls avec une épaule dégagée, mais autrement faudra peut-être rétrécir le col.
- Impossible d’enfiler un manteau par-dessus!
- Un fil foncé (et bigarré en plu!) dissimule la texture des points gansey
- La forme n’est pas exactement pratique. Le mouvement des bras est… restreint. Je comprends que le style ne plait pas à tout le monde. Le monsieur m’a regardé de travers pendant que je tournoyais devant lui pour lui montrer mon chef d’œuvre. Bon. Les gouts ne se discutent pas!
- J’ai manqué de fil! Je n’avais acheté que 5 écheveaux de Malabrigo et je n’ai pas eu assez de fil pour avoir des « manches » aussi longue que j’aurais voulu.
Les différences entre ce pull et mon t-shirt Battersea sont assez nombreuses qu’un nouveau texte était mérité (an anglais seulement, désolée).


I’m guilty of eating at my desk most days at work but today I’m taking a real McCoy lunch break in the food court with my laptop in order to write about my new sweater (cape? sweater cape? poncho with sleeves? whatever I love it.). I'm wearing it right now and hoping against all hope that a co-worker will comment today, because if I got a dollar every time someone said "nice sweater, did you knit this one?" and I answered "oh no... *grumble brumble*... storebought..." I'd be yarn-rich. Ok, my conscience points out that the size of my stash proves this is already the case and that I'm wasting precious lunch time. So anyway, when I cast off and tried it on last night I squealed a good bit, did a little dance, then steamed it quickly to take some photos. (TMI: Usually I’ll at least wash my hair and put in contacts before modelling an FO. That’s how eager I was get in some snaps before bed: unwashed messy bun and operating legally blind). Of course, after a while I spotted some things about the sweater-cape that bug me:
- The boat neck is probably too wide. So if you follow my instructions to the letter, yours will be too. I suppose it might look sultry/carefree if pulled to the side and worn off one shoulder but that's not what I was going for.
- It’s impossible to wear a coat over this!!
- The dark, tonal yarn hides the decorative stitches. I love this green, but if I were to start over I’d pick a lightr shade in classic cream or grey.
- The shape isn’t exactly the most practical since arm movement is… restricted. DH looked at me funny while I twirled in my sweater and ordered him to admire my master piece: "how do you move your arms?"
- I ran out of yarn! I had bought 5 skeins of Rios and ran out while knitting the cuffs, so they’re a little short for my taste.
A note about sizing: Sizes are based on the wearer’s bust measurement, not the sweater’s, which is considerably larger because all of this positive ease is required to be able to move the arms (well, at least a little!). Although my actual bust measurement is 34”, I knit size 35.5 for extra breathing room. Thankfully the top-down construction makes it easy enough to try on as you go – just transfer the stitches onto two pairs of circular needles with long (100cm+) cords and over the head it goes. And as always, if you you knit the sweater and would like to give back, please consider making a small donation to your local food bank or women’s shelter. Thank you!

Cape Battersea
Needles:- US5 DPNs or short circular needles for the collar
- US 7 circular needles for the body
- US 7 DPNs for the cuffs (or circular needle to work magic loop)
Yarn:
- For sizes 34 : 5 skeins of Malabrigo Rios or 1050 yards of worsted weight yarn. For size 35.5, I used *exactly 5* skeins, so it would be wise to have 6 on hand. For other sizes, your guess is as good as mine, sorry!
Sizes: (wearer’s bust measurement): 34 (35.5, 37, 39, 41, 42.5).
Gauge :
- 19 sts and 25 rows per 4” square *after blocking*. I alternated between English and continental knitting which makes my gauge a bit inconsistent throughout. I counted 19sts/ 4" in some spots, 20-21 sts / 4“ in others. Thankfully the oversized shape is forgiving.
Instructions :
With US5 needles, cast on 136, (144, 144, 152, 160, 168) sts and join to work in the round, placing marker to mark beginning of wound. Work in twisted rib as follows:
Round 1 (set-up round) : (k1, p1) to end.
Round 2 and all further rounds of ribbing : (k1 tbl, p1) to end.
Work in twisted rib for 1.25 inches.
Change to US7 needles. Working in twisted rib for one more round, place markers as follows : Work 43 (45, 47, 49, 51, 53) sts, PM, work 25, (27, 29, 31, 33, 35) sts, PM, work 43, (45, 47, 49, 51, 53) sts, PM, work remaining 25, (27, 29, 31, 33, 35) st.Begin working gansey pattern:
Round 1 : purl row - as evenly as possible across this row, increase a total of 0, (0, 8, 8, 8, 8) sts.
Round 2 : purl to end.
Round 3 (increase round) : kfb, k to 1 st before marker, kfb, move marker, kfb, k to 1 stitch before next marker, kfb, move marker, kfb, k to 1 stitch before next marker, kfb, move marker, kfb, k to 1 stitch before next marker, kfb.
Round 4: knit.
Round 5 : purl.
Round 6 : (increase round) pfb, p to 1 st before marker, pfb, move marker, pfb, p to 1 stitch before next marker, pfb, move marker, pfb, p to 1 stitch before next marker, pfb, move marker, pfb, p to 1 stitch before next marker, pfb.
Round 7 : knit.
Round 8 : This is where the first textured stitch pattern begins. Basically for this stitch pattern you will be working (k2, p2) across the first round, and for every consecutive round you will want to knit the purl stitches and purl the knit stitches. Think of moss or seed stitch, just a bit more exaggerated. With each increase round, simply incorporate the new stitches into the stitch pattern. (k2, p2) to 3 sts before marker, k2, p1, move marker, (k2, p2) to 1 st before marker, k1, move marker, (k2, p2) to 3 sts before marker, k2, p1, move marker, (k2, p2) to 1 st before marker, k1.
Round 9 : knit.
Round 10 : (increase round) kfb, k3, (p2, k2) to 3 sts before marker, p2, kfb, mover marker, kfb, k3, (p2, k2) to 1 sts before marker, kfb, mover marker, kfb, k3, (p2, k2) to 3 sts before marker, p2, kfb, mover marker, kfb, k3, (p2, k2) to 1 sts before marker, kfb.
Round 11 : knit.
Round 12 : k3, (p2, k2) to 2 sts before marker, p2, move marker, k3 (p2, k2) to marker, move marker, k3, (p2, k2) to 2 sts before marker, p2, move marker, k3 (p2, k2) to end.
Round 13 : (increase round) kfb, k to 1 sts from marker, kfb, move marker, kfb, k to 1 sts from marker, kfb, move marker, kfb, k to 1 sts from marker, kfb, move marker, kfb, k to 1 sts before marker, kfb.
Round 14 : (k2, p2) to 3 sts from marker, k2, p1, move marker, (k2, p2) to 1 sts from marker, k1, move marker, (k2, p2) to 3 sts from marker, k2, p1, move marker, (k2, p2) to one sts before marker, k1.
Round 15 : knit.
Round 16 : (increase round) kfb, k3, (p2, k2) to 3 sts before marker, p2, kfb, mover marker, kfb, k3, (p2, k2) to 1 sts before marker, kfb, move marker, kfb, k3, (p2, k2) to 3 sts before marker, p2, kfb, move marker, kfb, k3, (p2, k2) to 1 sts before marker, kfb.
Round 17 : knit.
Round 18 : k3, (p2, k2) to 2 stitches before marker, p2, move marker, k3, (p2, k2) to marker, move marker, k3, (p2, k2) to 2 stitches before marker, p2, move marker, k3, (p2, k2) to end.
Round 19 : (increase round) kfb, k to 1 st before marker, kfb, move marker, kfb, k to 1 stitch before next marker, kfb, move marker, kfb, k to 1 stitch before next marker, kfb, move marker, kfb, k to 1 stitch before next marker, kfb.
Rounds 20 AND 21 : purl.
Round 22 : (increase round) kfb, k to 1 st before marker, kfb, move marker, kfb, k to 1 stitch before next marker, kfb, move marker, kfb, k to 1 stitch before next marker, kfb, move marker, kfb, k to 1 stitch before next marker, kfb.
Round 23 : knit.
Round 24 : purl.
Round 25 : (increase round) pfb, p to 1 st before marker, pfb, move marker, pfb, p to 1 stitch before next marker, pfb, move marker, pfb, p to 1 stitch before next marker, pfb, move marker, pfb, p to 1 stitch before next marker, pfb.
Round 26 : knit.
Round 27 (seed stitch begins): (k1, p1) to 1 sts before next marker, k1, move marker, (k1, p1) to 1 sts before next marker, k1, move marker, (k1, p1) to 1 sts before next marker, k1, move marker, (k1, p1) to 1 sts before next marker, k1.
Round 28 : (increase round) kfb, work in seed stitch (purling the previous row’s knit stitches and knitting the purl stitches) to 1 st before next marker, kfb, move marker, kfb, work in seed stitch to 1 st before next marker, kfb, move marker, kfb, work in seed stitch to 1 st before next marker, kfb, move marker, kfb, work in seed st to 1 st before end, kfb.
Round 29 : Work in seed stitch.
Round 30 : Work in seed stitch.
Round 31 : (increase round) kfb, work in seed stitch (purling the previous row’s knit stitches and knitting the purl stitches) to 1 st before next marker, kfb, move marker, kfb, work in seed stitch to 1 st before next marker, kfb, move marker, kfb, work in seed stitch to 1 st before next marker, kfb, move marker, kfb, work in seed st to 1 st before end, kfb.
Round 32 : Work in seed stitch.
Round 33 : Work in seed stitch.
Round 34 : (increase round) kfb, work in seed stitch (purling the previous row’s knit stitches and knitting the purl stitches) to 1 st before next marker, kfb, move marker, kfb, work in seed stitch to 1 st before next marker, kfb, move marker, kfb, work in seed stitch to 1 st before next marker, kfb, move marker, kfb, work in seed st to 1 st before end, kfb.
Round 35 : Work in seed stitch.
Round 36 : Work in seed stitch.
Round 37 : (increase round) kfb, work in seed stitch (purling the previous row’s knit stitches and knitting the purl stitches) to 1 st before next marker, kfb, move marker, kfb, work in seed stitch to 1 st before next marker, kfb, move marker, kfb, work in seed stitch to 1 st before next marker, kfb, move marker, kfb, work in seed st to 1 st before end, kfb.
Round 38 : Work in seed stitch.
**Stitch count between markers at this point should be : 67, (69, 71, 73, 75, 77) each front and back / 49, (51, 53, 55, 57, 59) each sleeve. 232 (240, 248, 256, 264, 272) sts on the needles in total. There have been 88 (88, 96, 96, 96, 96) st increased since cast-on.
Round 39: knit.
Rounds 40: (increase round) pfb, p to 1 st before marker, pfb, move marker, pfb, p to 1 stitch before next marker, pfb, move marker, pfb, p to 1 stitch before next marker, pfb, move marker, pfb, p to 1 stitch before next marker, pfb.
Round 41: purl.
Round 42: knit.
Round 43: (increase round) kfb, k to 1 st before marker, kfb, move marker, kfb, k to 1 stitch before next marker, kfb, move marker, kfb, k to 1 stitch before next marker, kfb, move marker, kfb, k to 1 stitch before next marker, kfb. Stitch count between markers at this point : 71, (73, 75, 77, 79, 81) each front and back / 53, (55, 57, 59, 61, 63) each sleeve. = 248 (256, 264, 272, 280, 288).
Round 44: purl.
Round 45: purl.
Round 46: (increase round) kfb, k to 1 st before marker, kfb, move marker, kfb, k to 1 stitch before next marker, kfb, move marker, kfb, k to 1 stitch before next marker, kfb, move marker, kfb, k to 1 stitch before next marker, kfb. Stitch count between markers: 73, (75, 77, 79, 81, 83) each front and back / 55, (57, 59, 61, 63, 65) each sleeve. = 256 (264, 272, 280, 288, 296) sts total.
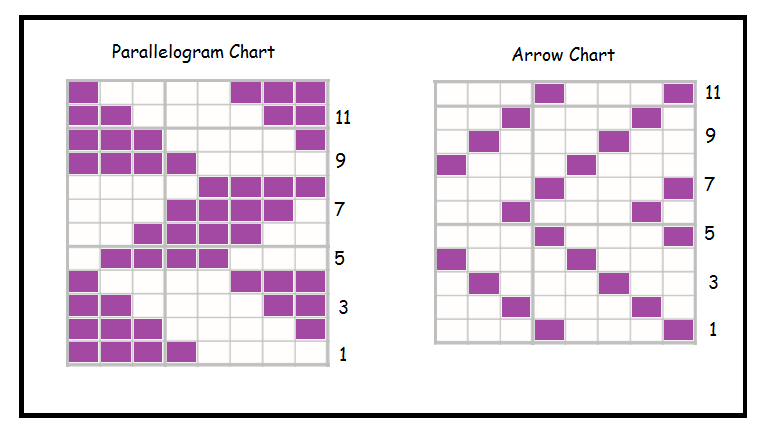
Rounds 47-58: work Parallelogram Chart. No increases.
Round 59 : (increase round) kfb, k to 1 st before marker, kfb, move marker, kfb, k to 1 stitch before next marker, kfb, move marker, kfb, k to 1 stitch before next marker, kfb, move marker, kfb, k to 1 stitch before next marker, kfb. Stitch count between markers : 75, (77, 79, 81, 83, 85) each front and back / 57, (59, 61, 63, 65, 67) each sleeve. = 264(272, 280, 288, 296, 304) sts total.
Round 60: purl.
Round 61 : purl
Rounds 62: (increase round) kfb, k to 1 st before marker, kfb, move marker, kfb, k to 1 stitch before next marker, kfb, move marker, kfb, k to 1 stitch before next marker, kfb, move marker, kfb, k to 1 stitch before next marker, kfb. Stitch count between markers : 77, (79, 81, 83, 85, 87) each front and back / 59, (61, 63, 65, 67, 69) each sleeve.= 272 (280, 288, 296, 304, 312) sts total.
Round 63: knit
Rounds 64 AND 65: purl.
Round 66 : (increase round) kfb, k to 1 st before marker, kfb, move marker, kfb, k to 1 stitch before next marker, kfb, move marker, kfb, k to 1 stitch before next marker, kfb, move marker, kfb, k to 1 stitch before next marker, kfb. Stitch count between markers : 79, (81, 83, 85, 87, 89) each front and back / 61, (63, 65, 67, 69, 71) each sleeve. = 280 (288, 296, 304, 312, 320) sts total.
Rounds 67-77: work Arrow Chart.
Round 78: (increase round) kfb, k to 1 st before marker, kfb, move marker, kfb, k to 1 stitch before next marker, kfb, move marker, kfb, k to 1 stitch before next marker, kfb, move marker, kfb, k to 1 stitch before next marker, kfb. Stitch count between markers : 81 (83, 85, 87, 89, 91) each front and back / 63 (65, 67, 69, 71, 73) each sleeve. = 288 (296, 304, 312, 320, 328) sts total.
Rounds 79-80 : purl.
Rounds 81-82: knit.
Rounds 83-84: purl.
Work in stockinette stitch repeating the increase row every 15th row, 3 times. (45 rounds worked).
Stitch count: 87 (89, 91, 93, 95, 97) each front and back / 69 (71, 73, 75, 77, 79). = 312 (320, 328, 336, 344, 352) sts total.
(The sweater will look pretty huge at this point, but because we’re not separating for the arms we need all of this fabric to avoid being swaddled Think batwings, not straight-jacket :)
Create arm/cuff holes:
(The sweater will look pretty huge at this point, but because we’re not separating for the arms we need all of this fabric to avoid being swaddled Think batwings, not straight-jacket :)
Create arm/cuff holes:
On the next round, k87 (89, 91, 93, 95, 97) body stitches to the first marker, move marker, k16 (17, 18, 18, 19, 19), place 37 (37, 37, 38, 39, 40) stitches on stitch holder or scrap yarn, k16 (17, 18, 19, 19, 20), mover marker, knit the 87 (89, 91, 93, 95, 97) body stitches to the next marker, k16 (17, 18, 19, 19, 19), place 37 (37, 37, 38, 39, 40) stitches on stitch holder or scrap yarn, k16 (17, 18, 18, 19, 20).
Stitch count on your needles is now: 238 (246, 254, 260, 266, 272) sts.
Continue working in the round, repeating increase round every 15th round, twice (30 rounds worked.) 254 (262, 270, 276, 282, 288) sts .
Work one round more, inc 2 (2, 2, 0, 2, 0) sts evenly throughout the round. 256 (264, 272, 276, 284, 288). We did this so that the total number of stitches can be worked in groups of 4 for the 2x2 twisted rib we’re about to knit!
Begin working in 2x2 twisted rib (k2tbl, p2). I continued using the US 7 needles because I wanted the ribbing to be more of a loose textural feature, I wanted to keep the bottom loose and flowy. Work in twisted rib ro desired length (I did 2 ½ inches).
Bind off using the Jeny’s surprisingly stretchy bind off. THIS IS KEY!! A regular bind off would create a tight band at the bottom giving the sweater more of a balloon shape.
Here are excellent written instruction on the stretchy bind off:
Here are excellent written instruction on the stretchy bind off:
https://www.youtube.com/watch?v=53Mtbkyf5CQ
Pick up armholes to knit cuffs:
Transfer live armhole stitches to double pointe needles. Attach yarn and pick up stitches along the gap. I picked up 9 stitches to bring my total cuff stitch count to 46. Pick up more stitches for a more generous fitting cuff, but I like mine snug.
Work in 1x1 twisted rib (k1tbl, p1) for desired cuff length. Mine are 17 rounds long. Again, mind off using Jeny’s stretchy mind off.
Weave in ends and block as gently or as aggressively as you need. I used my steamer because I was impatient, but I might wet-block next time to gain a few inches of ease around the waist and cuffs.
Weave in ends and block as gently or as aggressively as you need. I used my steamer because I was impatient, but I might wet-block next time to gain a few inches of ease around the waist and cuffs.


.jpg)